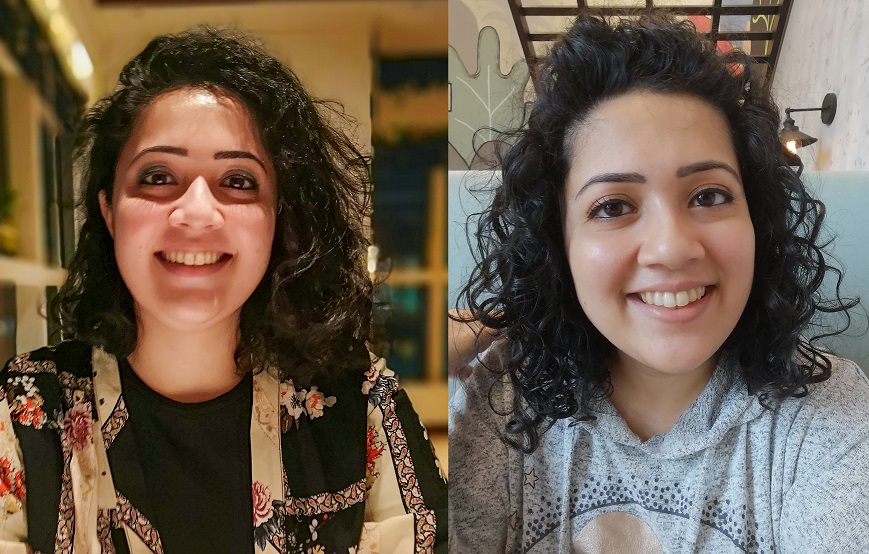
My hair has always been wavy, and on some days, it would sprout magical curls which I loved. But it was never consistent. On some days, I looked more like a frizz cloud than curly queen.
It was probably a year or so ago when I first heard about this magical realm called Curly Girl Method – but it all seemed so overwhelming, so I backed off. This year, I thought I should explore it again. I had some amazing advice from a friend who’s been doing it for a while, and that made all the difference (Thank you @labiba!).
I started the process in early August 2020, and have never looked back! I’ve never had a ‘bad’ hair day, not even after intense exercise, and I only wash my hair every 4-5 days now. Since posting about my journey on my Instagram, I’ve had a few questions about it, so here’s my starter guide to going Curly Girl!
Ummm hi, what is Curly Girl METHOD?
Essentially, it’s a process of taking care of your hair which involves using products that do not have sulphates, silicones, and drying alcohols. Plus, many people who follow this method do not use shampoo at all. When styling, you do not use straighteners either; if needed, you can use a diffuser at low heat. And something that was music to my ears: no brushing. Honestly, I used to brush my hair only to end up creating a bush, and I’d get frustrated because it’d just look worse than before I brushed.
I used this website, NaturallyCurly.com, for a lot of my reading on the topic, and then slowly branched out to looking up accounts of other curly girls to further inform myself (I’ll link to these below).
OK, I’M INTRIGUED. WHAT DO I DO FIRST?
Take the quiz on NaturallyCurly to figure out your texture and hair type! And please answer truthfully. Don’t answer how you’d like your hair to be, answer based on how it really is! I have 2B/2C hair!
I’M GOING TO GIVE THE CURLY GIRL METHOD A GO! HOW DO I START?
For starters, don’t panic. You will need to get a few new products, but go easy. Don’t buy a lot, and don’t buy in bulk. I tried to find ‘sampler’ sizes where possible, or the smallest bottle/tub size where I could because I’m trying to figure out what works with my hair.
To truly start Curly Girl, you will have to do what’s called ‘The Final Wash’. And once you’re on your path to curly girl, you follow all the steps below for your regular wash day but from Step #2. I haven’t added info here about deep conditioning and clarifying, or how to protect your hair at night, but if anyone’s interested, I can write more about that later.
1. Wash your hair with a shampoo that does not have silicones, but does have sulphate
Check if any of your shampoos have sulphates but no silicones. I luckily had one already that I was using, so I didn’t need to buy anything, because I only needed this one and final time. After you rinse this out, you’re on to the next step.
- I used Tresemme Botanix Curl Hydration Shampoo.
2. Co-wash your hair
Co-wash means ‘condition wash’. Remember I said many followers of this method don’t use shampoo? OK well, you can use a conditioner (no silicones or sulphates here either) to wash your hair. However, don’t expect the crazy lathering you get with regular shampoos. What you need to do is stick the co-wash on your scalp and scrub (please, not with your nails, but with the actual finger) for at least 5 minutes. Yep, I have a clock in front of my shower just for this. I would recommend doing this with your hair flipped down, and with you looking at the floor. Rinse thoroughly.
- For my final wash, I’d used Hask Cactus Water Weightless Conditioner, but I now have tried and still use these: As I Am Coconut Co-Wash and ASP Kitoko Hydro-Revive Cleanser (this is an approved shampoo). I have recently purchased Flora Curl but haven’t used it yet.
3. Condition your hair
OK, at this step, if you haven’t already, flip your hair down. Use conditioner and spread through your hair, and use this time to detangle. This is basically the only time you will “brush” your hair, but with your fingers. Some curly girls have used wide-toothed combs or Tangle Teezers to detangle your hair, so try it out and see what works for you. Once spread through your hair, we will ‘squish to condish’. Basically what this means is, your hair needs a lot of moisture, so you will take lots of water and squelch and squish your conditioner-coated hair (flipped upside down) with as much water as possible. You must be able to hear the squelching so when that stops, add more water. To reduce water wastage, do this over a little bucket of some sort. You can reuse the water in the bucket to squish back into your hair. Once you’re done squishing, rinse (unless you’re using a leave-in conditioner, then don’t rinse all the way).
- For this step, I currently use the Hask Cactus Water Weightless Conditioner or the ASP Kitoko Hydro-Revive Balm.
4. Style when wet
This was super new to me; I never used to apply any product to my hair post-wash. Start with a cream or a gel. I use what’s called the ‘praying hands’ method – which you can find on YouTube videos or on the Instagram accounts I’ve linked to below – and then scrunch up the cream by fisting clumps up towards your roots. I haven’t yet tried both a cream and gel, but I will write about it when I do!
- For this step, I have tried Cantu Moisturizing Curl Activator Cream.
5. Dry your hair!
Do not use your regular towel on your hair. Rubbing your hair or using a normal towel here will only serve to create frizz and destroy the natural clumps your hair has. Either use a microfibre towel or a t-shirt here to “plop” your hair up (again, see videos on Insta accounts below for how to plop properly). I normally leave this in for about half hour, then let my hair air dry. If you want to speed up the process, you can use a diffuser, but not at the highest heat!
6. Scrunch out the crunch (SOTC)
If you’ve followed all the steps accurately, once your hair dries, it’s going to crackle. It’s going to feel hard-ish, and when you move your hair around, you will hear a crackling noise. It’s ready. I like to rub the tiniest bit of natural oil in my palms, then scrunch up the hair and break the cast that’s formed with the gel/cream. Once done, you should have some curls!
THANKS, BUT I NEED MORE.
Okay! Here are some resources I did, and still, find invaluable:
- Instagram: @marisascurls
Absolutely love this account where Marisa actually breaks down so many steps for wash day, refreshing and much more in her highlights. I have watched so many of those and tried following her steps with great results! - Instagram: @katherinepagewaves
- Instagram: @curlywhirlyred
- Instagram: @swavycurlycourtney
- Instagram: @curlicue_lu
I’M BASED IN THE UAE – WHERE CAN I BUY CG-APPROVED PRODUCTS?
I’ve used these websites for buying products for my hair:
- Curlsfusion (and the Instagram account is amazing too!)
- Beauty Box Trading
- Curlshop
- My Fair Curl
- Noon (Yep! As long as you know what product you want, I’ve found these on here!)
OK! HOW CAN I CHECK IF A PRODUCT IS CG-APPROVED OR NOT?
I use these two websites if I’m not sure whether something is CG-approved. Now I have learned to recognise some ingredients upon reading, but these are good places to cross-check. I have found that sometimes both throw up different results so I input the ingredients on both to make sure.
I HAVE MORE QUESTIONS!
Okay, just pop across a comment and I’ll try and help! I’ve documented a lot of my journey on my Instagram Highlights, and I will continue to post. I will say this though: be patient. It took a while for my hair to transition, and also for me to remember what to do, and figure out what works best for my hair. All our hair is different so which products work for me may not necessarily work for you. I’m going to write up a little about the trials and tribulations along the way and tips and tricks soon, but thought a starter guide would be useful!

Leave a comment